Sunday 24 January 2010

First Engine Trial

This is the first attempt at using the tunnel from the impreza into the 205. The fit is nice but getting the tunnel to join with the floor pan is going to be tough and I think we will end up making our own in the end but its all very good for visuals and stimulating the mind into the next ideas.

Sooooo

With a large hole in the floor and bulkhead the engine was about ready to be offered into its new home. At this stage it is definately justa trial fit as no mounts are made up. We just need to see!

Photobucket
Photobucket

The chassis legs were "cleaned" of original mounts and extras etc. I was shocked how flimsy the steel is in the 205. Its quite shocking and makes me think of how many times I have pushed on hard in little pugs. Its quite an eye opener and we shall definately be uprating the strength in the chassis etc.

And........

It only bloody fits.

Photobucket
Photobucket
Photobucket

It sits quite far forward in the car but obviously no further forward in this project than in the original car when compared to the wheel centres.

This is the gap which will need to be filled to mount the subframe. Its actually not as big as this and ends up being about 3 inches tall. It shouldnt be too difficult.

Photobucket

One thing we have noticed is that the headlights will foul the cam covers if original items are used. So we are going to try and take a mould of the original lens and then shorten the width by 2 inches. Keeping a similar appearance over all but we will need to add something like Morrette lights into the cast we make.

Well there you have it. The latest installment of project SCUG.
Its coming along and it often feels like we are taken two steps forward and one back but we are learning all the time. Next stage in to get some welding gear in. As much fun as cutting is theres now not a lot of strength in some areas so we need to add some back in before too long. Next aim is to get the engine mounted so we can move to the rear and start getting the rear subframe in place.

An update coming soon.

Convertible Impreza Wagon

Time to move back to the impreza as the next logical step was to cut the tunnel and bulk head from the car so we could offer up parts to the 205.

Time to make a convertible. The roof of the impreza was getting in the way and to try and create as much space as possible we set to cutting the parts we wanted to keep from the car so we could dispose of the rest of it. This would give us a hole car space to work in and layout bits as the piles of junk were getting bigger whilst working space was getting smaller!


Ta daaaaaa

With rough measurements we had to start somewhere so we cut a minimal tunnel into the 205 as well. (If id known how many we were going to use I would have bought shares in cutting discs!)


Its difficult to talk about cutting bits of metal and making it sound interesting!


The view from the front - this hole would need to get bigger......MUCH BIGGER

SCUG front suspension

Well the engine was taken out of the Impreza with ease, thats one thing Japanese cars have over there european competitors : the cars are so easy to take apart and replace parts. Was only about 8 bolts to get the engine and gearbox lifted out and the engine bay was now empty to see exactly what was laying ahead.


Our main datum (whether right ot wrong remember we are no experts lol) are the front turret tops as these are pretty much unmovable from the shell and would therefore dictate the position of the gearbox for driveshaft allignment : then obviously the engine would need to be connected to the gearbox.

We already knew from measuring the turrets from the impreza and the 205 that the distance to centres of each turret only varies by a couple of mm. This can easily be taken up by adjustable top mounts.
By just trialling the fit of the subaru strut into the 205 turret we were amazed that it would actually fit with very minimal modification of the turret. This was a massive bonus as we thought that we were going to have to make whole new turrets up.


With the struts in place it was just way to tempting not to offer the sub frame into the empty engine bay to see if our measurements were actually correct. This would show if the chassis legs of the 205 were anywhere close to accepting / being modified to have the sub frame from the impreza mount without troubles. In actual fact its not bad at all. The 205 chassis is actually a little wider than the impreza and so with some slight boxing and chassis strengthening we will be able to mount the impreza sub frame to the 205 chassis. Thus keeping a lot of structural integritty of the car and also mean we dont have to make cradles etc to hod the engine and steering components.


From the pics you can start to see just how much wider the track of the impreza is compared to the 205. Our origninal measurements hinted at 3" per side. Again we were amazed at just how correct we were being smile.gif This isnt a problem and although it wont end up looking standard we liked the ultra wide track of the 205. It raised much debate and wether or not we should go the route of the typical T16 kit or not. To keep a uniqueness to the project we decided against it and have come up with some other ideas of making our own wings etc. But that will come much later.

Moving Slowly

Latest quick update.....

BBQ and home made punch equals no work done to project

Well not quite nothing.

Loom is labelled with label gun thing.
The loom is half out now and tucked safely away in a drawer so am hoping will be ok (hoping like hell as can feel the frustration of finding labels on the floor already)
Ok the very short update for the project.
At the end of last week we spent a few hours finalising the wiring loom. All excess wiring has been removed from the loom. Electric windows / central locking / heater controls etc etc are now all gone.
Worrying moment was starting on the Clifford alarm system - ahem, I dont have a clue why we all pay so much to have these fitted or how much the insurance companies really think these do! It was removed in no time at all and I really think that there are a lot of cars out there with not so much security as people may think
So with wiring removed as much as we feel appropriate the test was starting the car......would you believe it fired straight up
FInal couple of hours of that evening where spent starting to brace the suspension turrets etc. Just want some form of being able to remove the suspension mounts and keep them in roughly the correct geometry. So we decided to start and weld a frame like strut braces, and add some reference bars so we can weld in the new turrets in the 205 using levels etc.

Photobucket

Photobucket

Photobucket

Next stage - engine and running gear out and finish the bracing for the suspension tie ups. Hopefully tomorrow evening.

Stripping again

ts been a busy week this week - but unfortunately not on the project so not so much activity to report.

Basically the impreza has started to be prepared for the measuring stage and the major works to begin.

Saturday was spent with the aim of starting the wiring loom work needed.
Basically we would like to get the loom semi prepared before the car is in a state of non running. This way we can still test that everything works the way it should before any transplanting. If it works now, and then it doesnt work after transplanting we know something has gone wrong - rather than not knowing if its something in the wiring change we have done or something to do with the tranplant! (does that make sense???)

So first of all.....the rear interior components were removed from the impreza to expose the rear sections of wiring loom. Simple - much like the 205 the impreza seats are only kept in with a few bolts so this didnt take too long. Also like the 205 the imprezas plastic trim clips like to break, so resale of these parts has changed into landfill.

With the wiring loom exposed and multi meter in hand the 205 rear light clusters were grafted onto the subaru wiring loom. This isnt much of a job really - easier with the 205 wiring diagram, but dopey here forgot the subaru one so was just a case of trying it sometimes and the multi meter. Strangly enough both the 205 and the impreza dont have integral fog lights so sticking with the external fog light set up.

From here I worked my way forwards through the car - labelling and disconnecting EVERY connector that i came across on the wiring loom. Its quite a few you know

Photobucket

Photobucket

Photobucket

Each of the yellow bits in the photo is a label attached to the loom. And im not too far into the dash connectors yet!

Obviously we are hoping that the majority of wiring can be removed from the loom beefore the conversion. All electric window controls / heater controls / central locking / interior lighting etc etc etc will be removed. As with previous statements the aim is to do this whilst the car can still run in its current state. Proving that nothing we have done has messed anything up.

Photobucket

Photobucket

Basically I managed to get right the way to the front of the car and pull the connectors from the "in car" loom to the engine loom - hence why the headlight and indicator were removed from the car - and YES even the most obvious headlight connectors were labelled so hopefully no confusion later on.
The passenger wing was also unbolted (except for the stubborn broken bolt in the very bottom hence its still looks attached!)

I / We still have some dash to remove to get the drivers side wiring completely out and free to start stripping, but the back of it is broke now.

Photobucket

So this is what our project looks like now.......2 big piles of scrap lol

The stripping begins

Well all, had a few hours spent this week on getting the 205 stripped down ready for measuring etc for rough ideas on how to even start this conversion.

First things first the car was lifted onto axle stands so everything can be got at nice and easy.

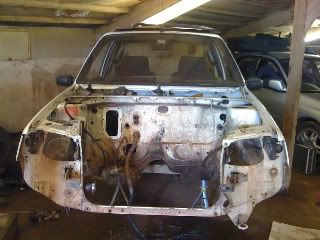
Ok so the major things came off quickly and to try and avoid any unecessary damage happening. So bonnet and front bumper were first to go. Along with the rear carpets and plastic panels. These of course are well easy and took no time at all.
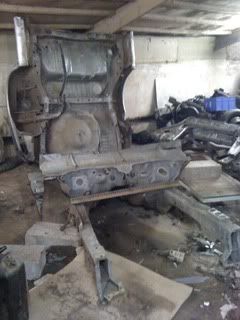
In doing this it reveals the 6 bolts to start removing the rear beam.

Photobucket

From under the car the first item to be cut was gone at - the rear brake lines were cut as they wont be used and we all know how bloody difficult they are to undo from their unions.
So once free from brake lines the 6 supporting nuts were removed from the car and the rear beam dropped to the floor and lifted away.

SURPRISES!!!!

1. Rear beam has grease nipples tapped into it suggesting a recent rebuild. The beam was excellent on car so am thinking it was done not so long a go. Ill get hold of the previous owner and check this out.
2. Rear Beam has Bilstein struts fitted which look also pretty new.
3. Solid Aluminium bush kit fitted to the rear beam.

All in all these items will help fund the build by being sold once cleaned up and details confirmed.

Moving to the front...........

Easy things removed so not to damage - lights / light adjusters / radiator and cowling.

Next we set to disconnecting the electrics / speedo drive / gear links / clutch cable etc and exhaust. Not too much of a problem here just really really dirty and oily from the 20 odd years this car has been on the road.
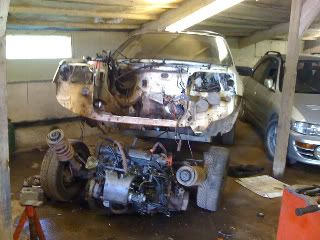
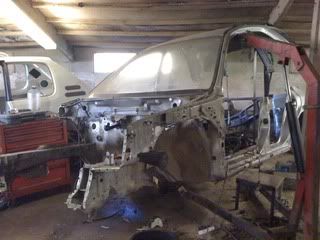
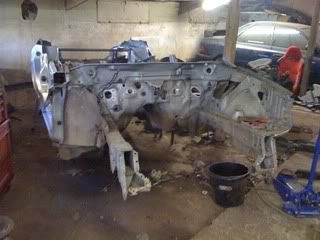
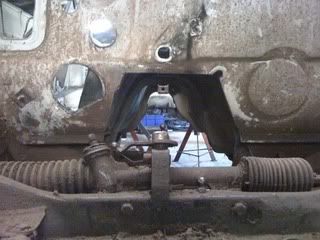
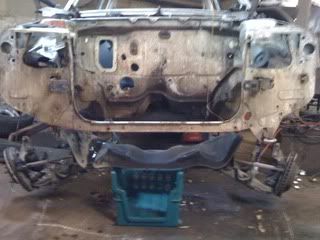
Eventually we got to removing the subframe from the chassis legs (4 bolts were worrying loose so check those bolts peoples!!!). The engine and box were propped using a large jack and wood whist the engine mount (upper only) and the gear box mount were undone.
By lowering the jack and a little muscle support the engine and subframe complete with front suspension was lowered to the groud and pulled away from the car.

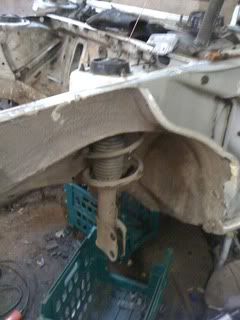
Only one surprise at the front - Front struts are also bilstein units

Photobucket

Photobucket


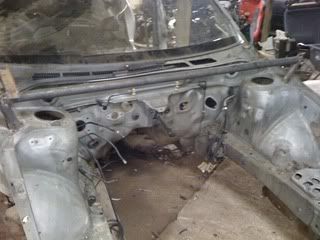
Moving inside..........

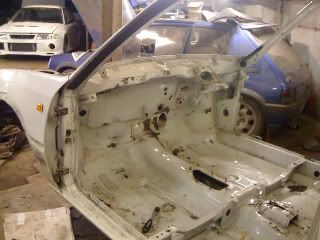
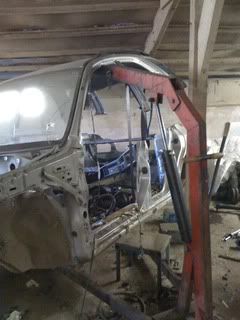
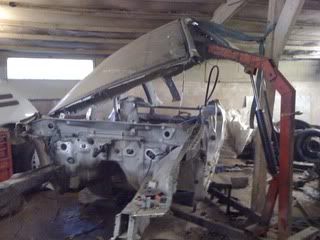
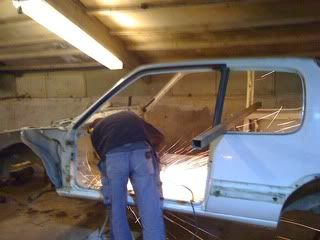
Gaining access to the inside was aided by removing the doors (this also protects them by being away from the shed roof support beam which is annoying close to the car). So seats were removed, along with roof lining and then the really annoying task of the dash compononets. How is it that cheap plastic and semi-mangled pozi head screws can waste so much time???? This could have been made a lot easier by not worrying about the dash and ripping it out with brute force but we want to sell as much as possible in this project. The same was true with the loom - nothing was cut but everything unclipped instead. Nothing really special to report in this as its all basically nuts and bolts.....

Photobucket

Photobucket

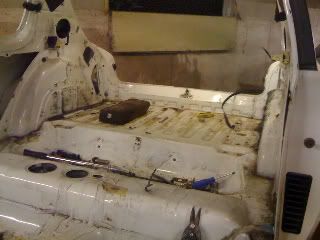
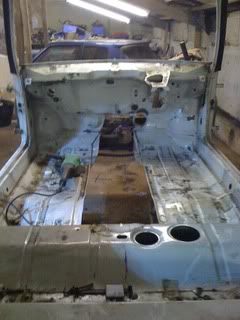
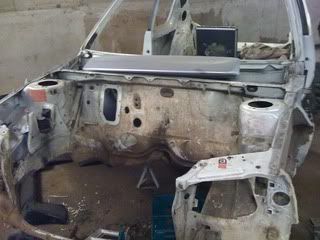
Finally the sunroof was started to be removed......obviously we knew the car had a sunroof, but it wasnt until we took it off that we realised the car used to be NON sunroof someone cut a big hole in her!

Photobucket

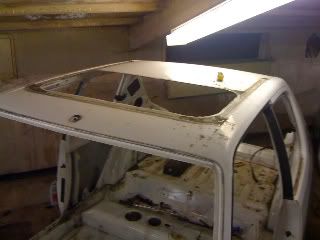
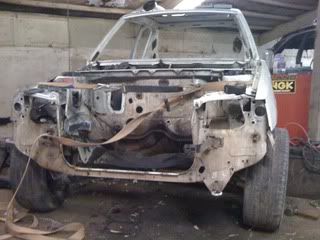
Overall, the car looks great with no rust anywhere. The floor is slightly bent in places due to someone jacking in the wrong place, no hidden weld patches and no signs of a shunt.

All in all we are really pleased.

We know this is the easy bit and also makes for a boring write up / read!

The new addition

In our quest to find a suitable donor vehicle for the 4wd project we have just been and bought a SUbaru WRX Import Wagon with a suspected head gasket gone, it still runs but has a fault code warning lamp lit so am dubious if its actually the head gasket - no milkyness on header tank cap - no bubbles forming in the header tank etc etc. Only time will tell I guess.

So here she is.....

Photobucket

Photobucket


Its actually quite sad that the wife and I could use a wagon like this as our everyday car but needs must so shes going for the chop!

After towing her back to her resting place, I mean place of transformation the partnership was formed.

Photobucket

Basically we are going to be taking the 205 back to a shell and then seeing how the subaru sub frames sit or probably more like it, dont fit. Youd never believe it but the distance between front strut tops is almost identical for both cars so hopefully just some minor adjustments needed for the front strut tops. Obviously front wings and iner wings will need chopping quite a bit as the track of the car is 5cm wider each side.

Looking at the engine bays the task ahead begins to really show itself!

From this

Photobucket

To this

Photobucket

So todays activities

Simple and pretty boring things obviously at the start of a project sad.gif So we pumped the fuel tank dry which actally resulted in a quarter tank of fuel to be used elsewhere - £15 paid back smile.gif keep it coming.
Next stage was to get ready to drop the engine out. As we are not using anything (well thats the plan) from this 205's running gear etc we decided to just pretty much unbolt everything and drop the lot. So off came the exhaust at manifold. All the loom was disconnected and water pipes to radiator / heater matrix taken off. Strut tops undone and up onto axle stands ready for the big drop. Next step will just to undo the subframe mounts and engine mounts dropping the front down as an assembly. Unfortunately time has stopped work for today but a pretty good start for a short working time. Oh and the radiator and cowling was removed also.

This is how it all looked by the end of today - ahhhhhhhhhh

Photobucket

Im going to try and keep log of the hours which go into this conversion as its always very difficult to remember how long youve ACTUALLY been working on something by the time a few months has passed.